Back to Facility Schedule Main Menu
The Pending Schedule feature acts as a temporary hold for a requested space. It is most frequently used when facilities are requested by an outside organization. For example, if an organization requests the use of a facility and the approver notices that their insurance has expired, or if the organization has a past due balance on an old invoice, the approver has the ability to mark the schedule as Pending until they receive the updated information or payment. This feature is available to Administrator and Site Administrator II roles and may be made available to Site Administrator I users.
How to Assign the Pending State to a Schedule
Generally, you will assign the Pending state to a schedule while processing requests.
- Click on the number displayed beneath Waiting Your Approval on your home page.
-
Select the Schedule title from the Waiting Your Approval drop down menu.
-
Click on Process/Approve Now displayed in red.
-
Scroll toward the bottom of the screen and select Pending Schedule?
-
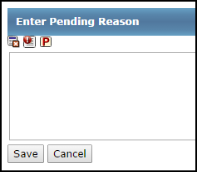
Click the Add/Update Pending Reason button if you need to add a pending reason.

*Note: It is not necessary to add a Pending Expiration Date. If a date is added, the system will only check for conflicts against that pending schedule through the indicated expiration date. If no date is defined, the system will automatically check for conflicts through the last event date that is listed on the schedule. Be mindful that the schedule will need to be Approved/Pending in order for the system to check for conflicts, Submitted/Pending will not check for conflicts.
-
Once the Enter Pending Reason box appears, you can either click on one of the 3 icons toward the left hand corner of the box to populate a predefined pending reason OR you have the ability to type your own reason. Adding a Pending Reason will trigger an email to the Booked By contact listed on the schedule, as well as ALL Administrators (if that email notification is turned on), as a reminder to follow-up on the pending schedule a few days before the first event date. See Account Settings for more information about setting the email notification time.
-
Click Save.

- Once the schedule has been marked as Pending and the Pending Reason has been added, click the Save button at the bottom of the schedule
To process a pending schedule, simply pull up the schedule form and select the option to Activate Schedule and click Save.
